Monday, August 31, 2015

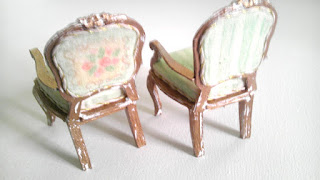
Louis XVI Ornate Chair

Well, this is the last furniture piece for the French Country House. There are 14 chairs in my house! WHEW! I should be a chair master by now! It's been a lot of fun and finishing up the furnishings will be a breeze now. It's all downhill from here. I've learned so much from building this house from scratch. I feel I can use all that I've learned on my future projects too. And, I'm confident I can make any piece of dollhouse furniture from scratch now.


With this chair, it is made similar to the other little fancy chairs. I cut layers of wood and card out, glued the pieces together for the frame.


Then I made the decorations on the wood with a dimensional paint and let that dry, gave it a coat of gesso, then gold paint, then I covered the "cushions" with plain fabric and drew a floral pattern on with colored pencils, rubbed the fabric to fade it out a little.

I was all out of wooden porch rungs so I made the front legs from bamboo skewers and glued little strips of paper around them for the "turnings". They are so delicate, I really had to apply the wood glue around the tops of them to get them sturdy enough.


Glued the pieces together and added cord for trim. This little chair matches the couch somewhat. I wanted it to be a different color. The last chair is done. I definitely feel this project coming to an end now!


The back and seat measurements were a little unclear as to the seat height so I cut down the back to make it shorter. My cushion still overlapped the wood piece separating it from the back so my cushions touched. I would have had to lower the seat more to keep them from touching and that didn't look right to me at the time. That was the only "off" measurement in the instructions in the book that I found - but again, it might have been my measurements were off because everything else in the book was spot on, exactly right.

If I make another chair like this, I will either make a thinner seat cushion or shorten the back more and maybe lower the seat a little. You should be able to see the wood piece in the back support on this chair... but I still like it.


Sunday, August 30, 2015

Coffee Table


I wasn't going to make this table either, that's why it's one of the last pieces to get made. I made an oval table but it didn't look right in the room so I finally gave in and just made this one instead.


I cut all the pieces out of basswood according to the instructions and glued them together. I had to make little adjustments to the measurements to get it to fit snugly into the shelf. I pre-fit it together before gluing.


Then I let that dry and then sanded the table smooth before giving it a coat of wood color acrylic. When that was dry, I lightly sanded the edges to give it a worn look.


The chunky square furniture does indeed go with the style of the room. I got the little tea set from ebay. I like this little table, it does add a certain amount of charm to the room. All it needs now is a few little books and magazines to make it look homey.


Thursday, August 27, 2015

Kitchen Stove


Well, I had to make one and I put it off until almost the last. I didn't want to make the one in the book and I couldn't find one I liked to fit my kitchen so I used Caroline's stove tutorial over at Cinderella Moments to help me make a stove to fit my little kitchen. I had to downsize it quite a bit to keep it at scale for my house and fit a space of 3-1/2" wide. Mine turned out kind of plain with no clock or decoration but that's how I wanted it.

After this stove I only have a coffee table and Louis XVI chair for the living room to finish all the furniture up... those little kits really helped save me a lot of time. But there's a small part III to all this now and that will be the finishing touches.


I'm making frame molds and picking pictures to hang. I have some books, curtains, rugs and candles to make and maybe a few more mirrors, I'm working on the dishes and I've bought the pots and pans. I just have all the "little stuff" to do to finish up my French Country house.


The little stove pieces went together pretty easy. I used straight pins to hinge pin the doors and sanded the edges to close after several coats of white paint and glaze. The little knobs are layers of card punched from two sizes of hole punches and glued together. And the oven rack is just florist's wire cut and glued in shape with wood glue. I love wood glue to hold wire because it looks like solder when you paint over it and it holds like super glue.

I love this little stove! You can also use the straight pin hinges on doors that you make in the frame but this is the first time I've used them on furniture. They work great!

Tuesday, August 25, 2015

Fancy Armchairs


I needed a couple more of these chairs for the living room so I cut my pattern out and started gluing. I didn't have any cabriole legs so I made some out of cardboard and glued the pieces together on the curve. When they were dry, I filled in the backs with glue, then vinyl spackling.


I reinforced the legs with wooden pieces underneath to add some strength to the chairs and added a layer of thin 1/16" balsa to the chair seats. Then I made the "carved" roses out of cardboard, then curled back the petals from layers of the card before gluing them to the chairs.


The chair pads and backs are made from foam core with the top layer peeled off and the edges rounded before covering with plain fabric. I used colored pencil to draw my fabric pattern on the chair seats and backs. The frames were gesso'd and gold paint was brushed on leaving some white showing through before the pads were glued on.


I pretty much followed the instructions in the book with these except I didn't use cabriole legs all around, I made straight legs for the back two legs.


The trim is glued all around the front, back and arm pads to finish it off.


The backs are just covered cardboard with no padding. I just need one more chair for the living room now. This chair would look sweet with aida cloth on the back and painted shabby white too. Aida cloth looks a lot like cane or open work on these miniature chairs.


Sunday, August 23, 2015

Kitchen Cupboard


This cupboard is made from two kits one for the hutch and one for the base. It is open on the top to display dishes. This is the last of the kits I used. The rest of the furniture to finish it up is hand cut and made.


It goes next to the buffet in the kitchen. I like that I can display some dishes in the top.


The little rim topped table would make a perfect little table for a tea set in the kitchen on the wall between the windows. I still need a stove for the kitchen.


I really don't know what I would have done if I hadn't come across a big lot of these dollhouse miniature furniture kits. They really helped me fill in all I need for the dollhouse. I would have been working on this thing for months longer than I anticipated if I tried to make "everything" from scratch! So glad I ran across them and their "quality" vintage look.

Saturday, August 22, 2015

Little Ice Box


I made a little ice box for the kitchen. The one I wanted to use was too big for the space so I had to design one that fit into the space for it.


I made a really simple ice box and lined it with aluminum tape and shelves.


It fits into the space for it. It's a cute little ice box that serves it's purpose but it's not very fancy. I might do a little more sanding, paint and a coat of triple thick but I don't want it to look too modern anyways.


Thursday, August 20, 2015

Kitchen Buffet


I made a little buffet for the kitchen from a vintage kit. These pre-cut kits saved me so much time on this project. I had planned to be near finished with the dollhouse by this time but there are still a million little things I want to do before it's done. I just stained this piece with an acrylic paint wash.


So, I still have three or four fancy chairs I want to make from patterns in the book, a coffee table, a cook stove, refrigerator, rugs, flower vases, pictures, books, candlesticks, food for the kitchen, and probably more things yet to go. I thought about putting walls on the back of the house (as big hinged doors) to keep the dust out. And I need to make a base for it so my steps won't get torn off when I move the house around.


I don't feel like I'm in a hurry to get anything done at this point, I'll get quite a bit of it done in my time frame. I'm just enjoying picking out the little things I like for decorating... oh, I forgot to make the living room curtains too... well, it might take me a little longer before I move on to another project since I'm still working on this one.


Wednesday, August 19, 2015

Vanity Chair


The vanity needed it's own special chair so I took one of the chairs from the kit and cut the back rails down.


I painted the chair white and sanded all the edges.


Then I covered the seat with a little piece of green upholstery fabric. It's just so stinkin' cute and a perfect match for the vanity!

Tuesday, August 18, 2015

Nightstand


This little nightstand is from a kit. It went together really easy. I decided to "stain" it with watered down acrylic paint. I don't have very good luck with oil based wood stains and they won't go over messy glue. And I'm messy with the glue.


I can do just about anything with acrylics that wood stain can do anyway so I prefer to use them and the cleanup is much easier. This is stained with FolkArt maple acrylic stain. I just sanded the edges for wear and it's all done. Easy Peasy!

Sunday, August 16, 2015

Fancy Armless Chairs


I've been wanting to make a few of these ever since I saw them in the book. I love the feminine quality of them and the old faded look of the material. I decided to make two of these because it's just as easy to make two as it is one. I just cut double everything and I only have to get my supplies out once so it saves me time. Gotta have lots of chairs and mirrors in this house!


They are made out of cereal box card glued in layers and the front legs on these are little wooden skewers with thin strips of card glued to them to imitate turned wood. Then they are pushed into small pieces of wood block. The cushions and insets are plain fabric covered cardboard. I drew the pattern on lightly with colored pencils and rubbed them with my finger to make them look faded.


The little twisted trim can be made with embroidery floss but I had some on a card already made with a gold thread running through it so that's what I used. I gesso'd and painted them with gold paint before gluing the fabric pieces on. I added six layers of paper towel to the padded sides and no padding on the backs. These are my new favorite chairs now.


I added extra wood for leg support to the underside of the chairs and the backs are very fragile but it wouldn't take much to add curved arms to these and make another set of chairs or cut out the center ovals and put aida cloth between the layers for another look... hmmm, always thinking of modifications. I might have to make one like that.

The backs of the chairs even have an inset so the chairs look pretty from both sides. The pink striped one will go in the kitchen as an extra chair and the floral chair goes in the living room.


Saturday, August 15, 2015

Little Tables


There were a few little tables that went together quickly from HOM kits. These will fill the spaces in the living room but can be moved around in other rooms if needed.


The one I really think is unique is the folding Queen Anne oval table. It has a little wire hinge that holds it flat or folded. It's really cute.


The little rimmed table is perfect for holding a tea set. You know the cups won't slip off the edge. And I've always loved a half round table. It fits against the wall and takes up very little room. But what I love about it is that it looks so elegant in any room.


I love the mix and match pieces of the living room. It makes it so cozy. The pieces look better when they are not stained all the same. You can mix them up a little bit. It makes it more interesting.


I just love the little marble top table. I dragged a dry brush of each color (gray, gold) across it and flip-flopped the brush while I was dragging it in one direction to make the marble look.

I actually have a set of real life tables that look very much like this table. I can tell you how to clean real white marble too. I use a bleach solution on mine and set them out in the sun for several hours every three or four years and they always come out beautiful!!


But I'm glad I don't have to do that on this faux miniature marble top table!


Thursday, August 13, 2015

Metal Wash Stand


Well, I'm really going to accelerate things now. I will have the house mostly done by my self imposed deadline, all except for the decorating which will not take much longer for the personal finishing touches. This cute little wash stand looks like painted, rusty metal. The wire gives it a fragile look.

I knew I was going to make one the first time I saw it in the book. It's that cute.


The pieces were all cut out of florist wire and cereal box card. Then they were glued together and coated with gesso.


When the gesso was dry, I gave it a rusty dry brushing with a little acrylic paint called brown sugar. According to the book you can underpaint it with black and then sand some off to give it a chipped metal look.


But I think it looks good just the way it is. I love the way it turned out. It really does look like old rusty painted over metal.


I added a little towel holder on one side. It will go in the bedroom to hold linens and bed clothes.

Tuesday, August 11, 2015

Mirrored Dresser


I thought about making this a changing table but since the baby has a cradle in the bedroom next to Mom, this could be big sister's room. So I thought the dresser should be for a little older child. I decided to paint it white too.


I put a little mirror on the back of it to give it a little character. I didn't want to use the drawer pulls that came with the kit so I used glass beads and wire on this one.


The drawers fit perfectly and the finished piece looks great in the "little girl/baby" room. I love these little House of Miniature kits but I will soon be making some more furniture from the book as I finish up the house because I love those too!