Tuesday, April 24, 2018

Painting Containers

Part of the fun of making little containers is finishing and painting them. It was hard to decide what colors to finish these with.


I really liked the galvanized metal look for the wash tub and flower containers but I liked a shiny metal paint look on most of the water cans.

I bought this little table at the Dollar Tree and just added a shelf to the bottom. Then I decided to make it a garden bench and paint it shabby.

The little flower pots turned out pretty good with a little white paint dragged on them for salt buildup and green paint to simulate algae.

Friday, April 20, 2018

Clothing for Mice

I love the mice I've seen that are wearing sweaters but to make a sweater that small, they either have to be cut out of a knit material and fray checked, or actually knitted that small. I decided to try to knit one but I didn't have yarn or needles that small.


So I took a 4 ply yarn and cut a good length of it and separated it into single strands. Then I tied it all together and wrapped it into a little ball. I used long toothpicks I had and sanded and rubbed them smooth to use as knitting needles. I figured out later that I could have used size 1 double pointed needles too. They looked about the same size.

So I set out to make a simple little mouse sweater. I'm already thinking of hats, coats, accessories, etc... this could be the start of a massive hobby.


So I also tried a fancy twisted yarn on size 1 double pointed needles and the stitches came out pretty big so I don't think I'll use that yarn. I can't separate it since it's just one big strand. I settled on 2 ply cotton because it comes in bright colors for the bigger sweaters and 1 ply where the strands are strong enough to knit. I made the first couple of sweaters a little large but I got the sleeves right by making a 6 to 8 stitch i-cord. No seams on them! I've made them before on things too narrow to seam and turn. I just guesstimate how many stitches it takes. All you have to remember is to pull that first stitch really tight.

So it's all a little trial and error to see what I like the best and then make them like that. Little bitty sweaters. They're so cutie-patootie! 

Tuesday, April 10, 2018

A Mouse Escaped

From my mind... actually a couple of them did. I have done a little needle felting before but not much. I did have some needle felting supplies on hand so I thought I might make some mice out of that. I tried different methods for the armature and feet.


I'm pretty confident of the needle felting itself but wasn't sure what kind of feet I wanted my mice to have. My first mouse skeleton was twisted out of pipe cleaner and came out pretty big at about four inches. I also wrapped his wire toes and tail with one strand of pink yarn and glue over about a 24 gauge wire. It turned out ok but I don't know if I like it well enough to spend that much time on each mouse. I plan on making 6 or 7 of them.


The second mouse I made a little smaller out of 22 gauge green floral wire. It's about 3 inches high. I made the hands and feet out of felt and glued them on. It was a lot quicker than wrapping them. And I do like the smaller mice as I think they will fit in the stump better.


And then there's dressing them when I get them done. I really really like the handknit sweater look on them so it takes me a couple of hours to knit each little sweater but it's worth it for the look. I hand sew the clothes onto the mouse. They are not sturdy enough to dress and undress without too much wear and tear. They're not really for much play anyway, just for looks or in this case to decorate my stump dollhouse.


I might try racoon, fox, rabbit or squirrel dolls too in the future. You never know where you're going to go with it when you start a new project.


These are probably some of the cutest little things I've ever made. They could get addictive... I could say that about all my hobbies though.


Thursday, April 5, 2018

Stump Cottage Revisited

The first thing I did the day I left the corporate world nearly 12 years ago was to come home and grab some cardboard and glue. I made a stump dollhouse. I was not going to spend one more day in a cube without a window to look out of. My peeps are in nature and I need to connect!


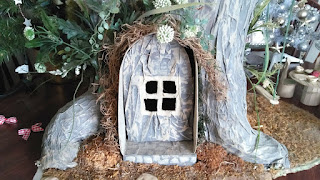
This is what I made. I built the shape out of a case of coke cardboard and added paper grocery bags dipped in paper mache and draped over it to look like tree bark. That ranks right up there with one of the best days I've every had! I was over it just that quick!


Well, it's been in the closet for the past six or seven years and I'm wanting to build or re-do something. I never worked with the inside of the house or took it any further than making the stump. I went on to many other creative endeavors since then. I think it's about time to re-do it and I've got some more experience with miniatures now plus a few ideas on making some mice to live there when I get it done.


So I'll be cutting it open and decorating the inside for my little family of mice that are just running around in my head at the moment. OUCH! One of them just tripped over my amygdala!


I'm going to re-do the cardboard windows and make them out of wood twigs I think. Wouldn't it be cute to make the awning look like a mushroom growing out of the tree? This is going to be fun!


The inside is just raw cardboard. I didn't do any finishing on it at all. If things so south when I cut it open for a door and gut it out, I am considering a mouse house shaped like cheese. I saw something back in the 70's in the back of a magazine and can't remember much more except it was a pattern for a cheese dollhouse and furry mice to make. I will have to count a lot on my memory if I go in that direction.

But I don't think I'll have any trouble making the inside look like a hollowed out tree. Gotta get a few projects out of the way before I start.