Saturday, October 20, 2018

The Front

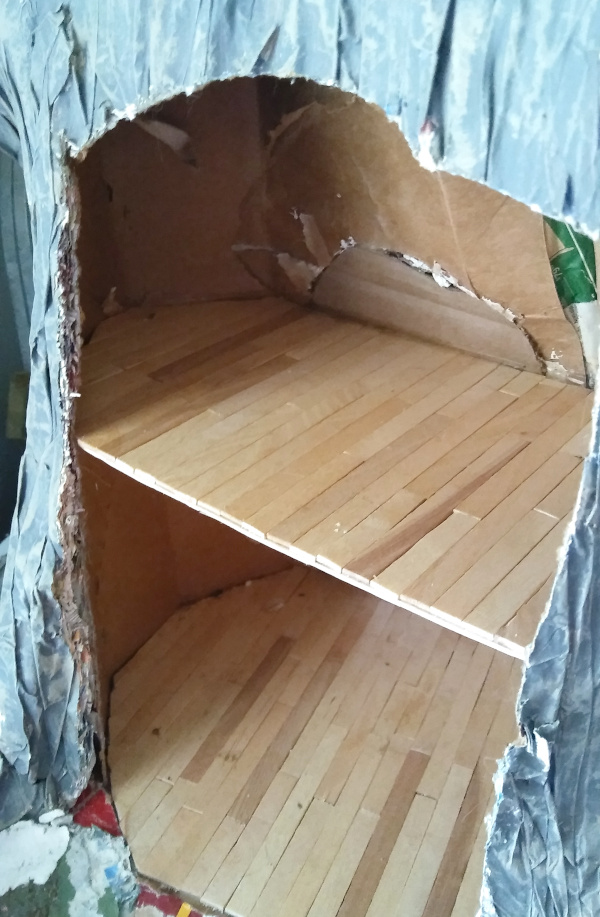
First I had to patch some places on the tree that have been pulled off when I removed the bushes and bird nest. Then I covered the porch with little paper clay stones I made and spackled them. I fit everything into the opening and glued it from the inside.


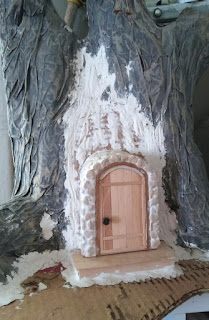
I made a step out of wooden popsicle sticks and glued it in place. Then I added the finishing glue and spackling trim on the edges to stick it in place.


I also filled in the front with paper clay to match the bark a little better. I'm considering a balcony and cutting a few windows out while it dries. I need to put some better hinges on the door. The cat climbed in and messed the door up playing around.

He thought I made the house for him. Silly cat.


Maybe he knows it's going to be a house for mice.   > ^^ <

Wednesday, October 10, 2018

Making Floors

I learned about making hardwood floors from my other remodels. First I had to use paper to make a pattern to cut out some card. Then I fitted the card in the space and finally cut and glued popsicle sticks down to the card.


I have a great hand-saving tool for cutting popsicle sticks. It's called 'Super Easy Cutter' by Midwest Products. It saves me from getting hand cramps. That's a lot of popsicle sticks to cut and I used to do it with sharp scissors. I like this tool better.

On a ground floor one layer is fine but on a second story floor, you have to do both sides to get it rigid enough not to bend. So I ran the sticks in opposite ways for each side. I thought about cutting a hole in the floor for a ladder or steps but I know from experience that although it might be cute, mice don't need ladders to climb walls. :)


The first story floor was pretty easy to measure but the second story was nearly impossible to measure so I stacked DVD's into the stump to the height I wanted and started piecing cards to the edges and taping them together until I had the whole second story floor covered. That was my pattern. So I cut out a single card shape and glued sticks to both sides.


Then I glued the first floor in and set a weight on it until it dried. I stacked the dvd's back up to set the second floor in and glued it in too.


The next day they were dry. I haven't decided how I want to finish the interior walls yet but I will probably use sticks on them to reinforce and help prop up the second floor. I might keep everything wood colored.

I have decided to cut out some windows and add some lighting. Next, I'm going to be working on the front.


Saturday, September 29, 2018

Making The New Door

I started out with popsicle sticks and make a door by gluing them over heavyweight card.


Then I put hinges on the door and frame inside the stone archway I'm going to make. Everything is done on cereal box cardboard.


I made sure the door opened good. I'm going to cover the outside of the archway with my "stones" which are lightweight because they are made of paper clay. Then I'm going to paint them light tan and then grout them with lightweight spackle.


But first I made sure everything fit into place and looked just right. I really downsized that door for my mice.

I will have to go over the old doorway seam and make it look like it fits in with the old bark of the tree. That shouldn't be too hard to do while I'm adding more paper clay over the paper mache to make it sturdier especially around the roots which I've discovered are kind of weak.

Next - I' finish the doorway.


Friday, September 21, 2018

Stump Cottage Tear Down

WHEW! Let the fun begin!

So it took me a while to make room for my stumpy remodel. I didn't forget it. It's been in the back of my mind most of the year. I've been pretty busy.


DECONSTRUCTION

The first step is to remove all the old stuff, stripping it down to basic stump. Then I decided to make it mouse sized, I needed to make a smaller door and two stories in it. I cut the back off and set it aside. Then I cleaned out all the old paper and gunk inside.


I had to fill in the door hole to bring it down to the size I wanted the new door to be. I want to make a stone tilt out for the entry and door frame so I needed to make it out of card and glue it all together.


It took a couple of days for everything to dry. I had to bake my paper clay stones. My paper clay was so dry even after wetting it. I need a fresh batch of that stuff.

I had to make some stones out of paper clay so I could put them on the door entry way.


Next - working on the door.


Friday, May 4, 2018

Tiny Dollhouse

I got the tiny doll's house dollhouse painted. I also finished the inside and decided to make a little couch for the living room.


The floors are just dry brushed with different shades of a brown acrylic wash and sealed with a satin gloss finish to look like wood.


This was probably the tiniest project I've worked on in a while but it convinced me to stick to 1:12 scale!


Tuesday, April 24, 2018

Painting Containers

Part of the fun of making little containers is finishing and painting them. It was hard to decide what colors to finish these with.


I really liked the galvanized metal look for the wash tub and flower containers but I liked a shiny metal paint look on most of the water cans.

I bought this little table at the Dollar Tree and just added a shelf to the bottom. Then I decided to make it a garden bench and paint it shabby.

The little flower pots turned out pretty good with a little white paint dragged on them for salt buildup and green paint to simulate algae.

Friday, April 20, 2018

Clothing for Mice

I love the mice I've seen that are wearing sweaters but to make a sweater that small, they either have to be cut out of a knit material and fray checked, or actually knitted that small. I decided to try to knit one but I didn't have yarn or needles that small.


So I took a 4 ply yarn and cut a good length of it and separated it into single strands. Then I tied it all together and wrapped it into a little ball. I used long toothpicks I had and sanded and rubbed them smooth to use as knitting needles. I figured out later that I could have used size 1 double pointed needles too. They looked about the same size.

So I set out to make a simple little mouse sweater. I'm already thinking of hats, coats, accessories, etc... this could be the start of a massive hobby.


So I also tried a fancy twisted yarn on size 1 double pointed needles and the stitches came out pretty big so I don't think I'll use that yarn. I can't separate it since it's just one big strand. I settled on 2 ply cotton because it comes in bright colors for the bigger sweaters and 1 ply where the strands are strong enough to knit. I made the first couple of sweaters a little large but I got the sleeves right by making a 6 to 8 stitch i-cord. No seams on them! I've made them before on things too narrow to seam and turn. I just guesstimate how many stitches it takes. All you have to remember is to pull that first stitch really tight.

So it's all a little trial and error to see what I like the best and then make them like that. Little bitty sweaters. They're so cutie-patootie! 

Tuesday, April 10, 2018

A Mouse Escaped

From my mind... actually a couple of them did. I have done a little needle felting before but not much. I did have some needle felting supplies on hand so I thought I might make some mice out of that. I tried different methods for the armature and feet.


I'm pretty confident of the needle felting itself but wasn't sure what kind of feet I wanted my mice to have. My first mouse skeleton was twisted out of pipe cleaner and came out pretty big at about four inches. I also wrapped his wire toes and tail with one strand of pink yarn and glue over about a 24 gauge wire. It turned out ok but I don't know if I like it well enough to spend that much time on each mouse. I plan on making 6 or 7 of them.


The second mouse I made a little smaller out of 22 gauge green floral wire. It's about 3 inches high. I made the hands and feet out of felt and glued them on. It was a lot quicker than wrapping them. And I do like the smaller mice as I think they will fit in the stump better.


And then there's dressing them when I get them done. I really really like the handknit sweater look on them so it takes me a couple of hours to knit each little sweater but it's worth it for the look. I hand sew the clothes onto the mouse. They are not sturdy enough to dress and undress without too much wear and tear. They're not really for much play anyway, just for looks or in this case to decorate my stump dollhouse.


I might try racoon, fox, rabbit or squirrel dolls too in the future. You never know where you're going to go with it when you start a new project.


These are probably some of the cutest little things I've ever made. They could get addictive... I could say that about all my hobbies though.


Thursday, April 5, 2018

Stump Cottage Revisited

The first thing I did the day I left the corporate world nearly 12 years ago was to come home and grab some cardboard and glue. I made a stump dollhouse. I was not going to spend one more day in a cube without a window to look out of. My peeps are in nature and I need to connect!


This is what I made. I built the shape out of a case of coke cardboard and added paper grocery bags dipped in paper mache and draped over it to look like tree bark. That ranks right up there with one of the best days I've every had! I was over it just that quick!


Well, it's been in the closet for the past six or seven years and I'm wanting to build or re-do something. I never worked with the inside of the house or took it any further than making the stump. I went on to many other creative endeavors since then. I think it's about time to re-do it and I've got some more experience with miniatures now plus a few ideas on making some mice to live there when I get it done.


So I'll be cutting it open and decorating the inside for my little family of mice that are just running around in my head at the moment. OUCH! One of them just tripped over my amygdala!


I'm going to re-do the cardboard windows and make them out of wood twigs I think. Wouldn't it be cute to make the awning look like a mushroom growing out of the tree? This is going to be fun!


The inside is just raw cardboard. I didn't do any finishing on it at all. If things so south when I cut it open for a door and gut it out, I am considering a mouse house shaped like cheese. I saw something back in the 70's in the back of a magazine and can't remember much more except it was a pattern for a cheese dollhouse and furry mice to make. I will have to count a lot on my memory if I go in that direction.

But I don't think I'll have any trouble making the inside look like a hollowed out tree. Gotta get a few projects out of the way before I start.


Saturday, March 31, 2018

A Dollhouse for My Dollhouse

Teeny tiny. This little doll house is tiny! It's for a doll's house. The base is 2-1/2" x 1-3/4" and it's only about 3" tall. Check out this video on YouTube by The Square to Spare. I took her idea and modified it to suit me. I used toothpicks for the railing. Everything else is cardboard since my hands are not as strong as they once were and it's really a pain to cut out wood with an exacto. The top story is basically a roof. I modified the porch, doorway and windows a little.


So I took her idea and tried to duplicate it in cardboard. I had some empty cereal box weight cardboard lying around (ok so I got a sweet tooth) and I also had some shiny thin card stock that I used for siding, although I might paint over it later.


This is just a start of a tiny really involved project. I put dividers in my rooms for additional strength and support.

I spent a whole day on this so far and didn't quit until 1 a.m. You could say I was focused.

Yes, I plan to decorate it and make teeny tiny furniture for it too. This is just the start of it.


Tuesday, March 20, 2018

Making Little Containers

I've been making little containers. I can't decide if I want to make a garden scene or a wash day scene. I think I'll probably make both eventually but for now I'm just making containers to hold things for both.


It's a lengthy process to make flowers by themselves. Paper or polymer? I think polymer would be sturdier but paper is more translucent. Paper has its limits though. It's not waterproof and it does collect dust that can't be cleaned off. Paper fades... ok so I talked myself into polymer. I'll probably make some of both.


So, I needed flower pots and watering cans and flower tubs. I don't know if I'll do a garden scene or a flower shop scene but that will probably depend on how my flowers turn out.


I'm getting all these ideas off of YouTube and just going with them. Some of them I make up all myself like the wash tub and the laundry basket. I just cut out freehand what I needed from cardboard and just made them.


The laundry basket is made from weaving embroidery floss through cardboard of an oval sunburst basically. I drew it freehand and cut it out with scissors. Same with the tub. After making the flower pots, I just drew a bigger curve shape freehand and cut it out.

Next, I will be painting them all.


Friday, March 9, 2018

Wash Day

So while looking for inspiration for the next build, I ran across these instructions for a little old Maytag wringer washer. My Mom and my Grandma each used to have one. My Grandma still washed in hers until she moved in 1970.


I used to wonder why we didn't have a modern washer when I knew they made them. I saw them in the laundromats I would visit with friends. As it turns out, I come from some mighty frugal people. As long as something works, you don't get rid of it. That's just the way I grew up.


So that being a childhood memory for me, I wanted to make one. As it turned out, I had the pill bottles so I dumped out the expired aspirin in one of them and put the generic claritin into another bottle for the inside tub. The plastic bottles were easier to cut with my exacto knife than I thought they would be. Everything else I already had, or made from heavy card except for the electrical cord. I think the inside agitator of ours was black or gray, it wasn't red I'm pretty sure. I might repaint that. The old blue ones had a blue agitator from pictures but I've never seen a red agitator.


I had some soft wire for the drain hose so I just gutted it and replaced it with florist wire so I could bend a hook to imitate the hose end to fit over the sink. That is one thing I remember from my Mom's old washer. The water hose was stored in the tub and you hooked it to the kitchen faucet to fill the tub.

I did have to go get a soft thin cord for the electrical cord. I got a set of white ear buds at the Dollar Tree and cut the wiring apart into long single sections of cord. I colored it gray with an alcohol ink marker and draped it over the swing arm of the wringer. I had to make a little plug with some clay and wire. I have not glued my wringer to the swing arm so it rotates like a real one.


I followed the tutorial at Dollhouse Miniature Furniture and made substitutions and added my own little touches along the way. It's not perfect, I could have sanded it smoother but it's good enough for me and my childhood memories.


Wednesday, February 28, 2018

Faux Metal Bird Cages

I made one of these a while ago but thought I would make some more because I really like them. They are cute as a button.


I got the tutorial from Dollhouse Miniatures by Elizabeth . Start saving your empty little pill bottles now to use as a mold for the wires. Or you can also use your clay rollers as they are about the right size. You will just have to tape the wires down until dry.

You can make the top cap out of jewelry finding end caps or make some out of polymer clay or other beads. It's up to you. They're so stinkin cute I just love them. I've thought about putting a little bird in them for a dolls house decoration.


You can also use empty pill bottles as a base for making little baskets. I'll get into that maybe later. There is just so many pretty things to make.


Sunday, February 11, 2018

Add a Couch

I just had to make a couch to match my chair. I just extended the pattern and made 2 cushions with a split skirt on the front and a kick pleat. My lofty quilt batting does make it look overstuffed but I like a comfy couch anyways.


I've about got it narrowed down to a fine art now. Step-by-step makes it go quickly but the time consuming part is always the trim. It takes a long time to cut out and get the piping done. It's not that hard, just really, really messy and time consuming. You have to squeeze the fabric around a thin piece of string and all that glue smooshes out through the fabric. I can't think of an easier or less messy way to do it.


If you don't like working with sticky fingers, you won't like making piping. And it's O.K. if you want to leave it off. But it looks so stinkin' cute! These chairs and sofas can be altered any way you like. You are the designer.


Little pillows and maybe a tiny afghan would look cute! I'm thinking ahead again.


Thursday, February 1, 2018

My Overstuffed Chair

I have made a lot of miniature furniture from scratch in the french style but I've never made an upholstered chair - until now. I ran across instructions for this little chair on a Dollhouse Miniature Furniture site a few years ago and only just recently (who knows why) decided to make one.


The author Kris got the pattern and instructions from another miniaturist, Ray Whitledge and modified it to suit herself. She gives a very thorough tutorial on how to do it so I won't repeat her instructions here but maybe just a few bits and tips on how I did it so I can show off my little chair too.

I picked a modern pattern for the chair fabric. I modified the instructions for what I had to work with and it turned out good for me. Instead of using mat board (which I did not have - I know, I'm surprised too as I thought I had one of everything), I used cardboard from cereal boxes because it is heavier than card stock or poster board. It worked fine.


I also used glue sticks from the Dollar Tree. I got 8 of them in a package for $1. They also worked fine for me. I had medium loft polyester quilt batting so I used that. If I hadn't had that already on hand, I would have experimented with toilet paper or paper towel padding to get the look I wanted. So I used what I had. I didn't go buy anything new. Yeah, I have an awesome craft stash. 

I did not compromise on the Aleene's tacky glue. It's the only glue I use for my paper and fabric crafts. It dries clear and it's not shiny if you get a little on the fabric. You'll love it! I always keep a few bottles on hand so I don't run out. I found a 3 ox. bottle of it at the Dollar Tree.


I also used some wooden beads I already had for the chair legs. I like legs on my dollhouse furniture. They went on before I put the skirts on the bottoms so it looks right. 

Another tip is to use large rubber bands around the chair where you can while the glue sets or you will be holding it for several minutes until it grabs. I kept going around the other areas and pressing the pieces together until the glue grabbed it. You can also give the tacky glue a few minutes to stiffen before you press your pieces together and it will cut the time you need to hold it.


I loved making the piping although the chair looks overstuffed and finished without it, it adds so much detail. I used hemp cord instead of crochet string or waxed string because that's what I had. You can probably find many substitutes that will work. You can also edit or change the pattern to make a different shape or type of chair. Do what you want.

Don't skip the boxing in of the cushions and the piping. It really adds that realistic touch. I do the piping last and was surprised at how easy it was to make. Once the piping is dry it will be very stiff from the glue. I was also surprised at how heavy the chair was when it was done.


Making your own minis gives you much better quality than what you can buy ready made in the dollhouse furniture section of the crafts store. This is probably the best tailored, realistic-looking and darndest cutie-patootie chair I've ever made! Now I must make more.

Monday, January 22, 2018

I Made a Miniature Guitar

I know it's been a while since I posted on this blog but I'm still here. I've been wrapped up in my other interests (wish I could narrow it down a bit) but I'll be filling in this blog (I have a few) and updating it as needed. Once again I have the desire to make some miniatures.

I saw these being made on YouTube by several different people and thought I would give it a go. I think the best instructions were from The Square to Spare . I don't play any musical instruments and I'm not musically inclined, although I do like to hum. :) I do love the idea of making music and find musical instruments strangely beautiful.


So I knew when I saw these that I had to at least make one. So I already had some popsicle sticks (you might call them lolly sticks) and glue, thread, exacto knife and everything I needed EXCEPT the coffee stir sticks (for the sides) that bend so easily after being soaked in water overnight. Regular popsicle sticks will not do that I found. So I used heavy cardboard instead for the sides of the first one and it worked. I'll get some birch wood coffee sticks later.

I used paper clay as a wood patch to level out the sides and sanded all with an emery board. I followed the instructions as best I could and this is how mine turned out:


I used triple thick to glaze it with and no matter what I did, it still has tiny air bubbles. I probably should have used thinner coats and sanded in-between them but I have a life and didn't want to spend the rest of it on this one little guitar.

I like it and I'll probably make more after the blister heals and my wrist quits hurting. I didn't realize until later that I apparently had the death grip on it for precision.


P.S. I now have a box of 1000 coffee stirring sticks just for maybe one or two more guitars... this is how hoarding starts. I'm a craft supply hoarder. The irony is that I don't stir anything into my coffee. I drink it black. Better hang onto them. Who knows when I might need one again. Right?