Saturday, November 30, 2019

Mouse House Furniture

I actually got to the end of this thing and thought my mice might be too big for the furniture. But as it turned out, my furniture was just right at half size. My mice won't bend to sit in any chairs no matter what size it is though. They are wired to stand.


When I bought this furniture from a put together kit, I didn't know what I was buying it for so I never used any of it until now. A lot of my finished pieces come together like that. I don't know why I want to make some things but eventually, they all find the right home. Just like this time.


I painted a few family portraits for the pictures of distant relatives and popped them into little frames. Then I hot glued them onto the walls.


I don't remember where I got the little hutch from. I've had it in my stash for a while and it fit perfectly. I painted all the furniture with white chalk paint and dry brushed a light tan color over it to age it.


The set had four chairs so I put one of them upstairs.


Thursday, November 28, 2019

Adding More Moss and Plants

My favorite part of making a doll house is adding the finishing touches. That's where I usually get the most and best ideas for pulling it all together the way I imagined it to be.

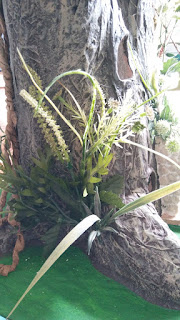
I love adding moss plants to this stump. I dragged out my mini box of goodies and pulled out everything I thought I could use on this. The little glass stones were in there like they were waiting for just the right project. So I ended up gluing little pieces of moss in between them.


Love these little weeds. I had them on the old stump and I liked them so much that I decided to keep them on the re-do.


THE BIRD's NEST

I have loved this bird's nest so much I decided to put it back on the re-do. I got the nest at a craft store years ago (I don't even remember where) and I made some new little eggs out of paper clay but they're not dry yet. The twisted stick is from my yard.


I've got moss, lichen and other little goodies from nature and some that were mixed together in a bag of potpourri. I got the moss and lichen from a craft store.


OTHER VEGETATION

Mushrooms are fun to make out of paper clay. I made these mushrooms a while back for another project and they were leftovers. I got my little gnome from the Dollar Tree.


I thought a little garden area and window boxes would add so much to this little stump. After all, if mice can wear knitted sweaters, then you know they can garden too. So I added a fairy garden on one end.


I'll keep adding bits and pieces until I call it done. I'm loving this so much that I'm thinking of making more woodsy cottages... only on a smaller and quicker to get done scale.


Tuesday, November 26, 2019

Finishing Windows and Panes

I decided to use a soft packaging plastic for the windows and use sticks for the pane frames. My main goal is not so much to make them look realistic as it is to just keep the dust out. I can really start to see it coming together now.


I took window boxes from another unfinished project and cut them down for these windows. I added little potpourri pieces of natural nut and seed shells to the windows to make awnings.


First I made little paper cutouts of each window shape and then I cut them out of my plastic sheet of flexible packaging plastic. Even thin plexiglas would have been hard to cut with all those circles and I was afraid it would split and crack on me.


I just gathered some sticks out in my yard along the fence line and cut them to fit each window. I used a strong wood glue to glue them in place. Wood glue is hard as a rock when it's dry and it will fill in small cracks and crevices too.


Sunday, November 24, 2019

Painting Bark and Greenery

I love the exterior bark look on this. When I made the stump back in 2006 I used sheets of brown paper dipped in paper mache to drape the crumbly wood texture onto a taped cardboard shaped stump. I loved the way it dried with all the nooks and crannies.


This is the final paint job. It has a lot more contrast than the first paint job. I used dark brown as a base coat this time and did dry brush gray and tan over it in layers until I got what I liked. It just made that bark pop!


Once I got all the bark painted, the rest went real quick. I got most of the outside decorated in one day. I put sheet moss on the grass and just added garden areas to the sides.


My outside climbing vines look pretty good to me. They reminded me of tobacco twists but I used them anyway.


 The (mostly) finished outside is absolutely beautiful!


I'm going to do a lot to the front. Those windows will be absolutely adorable when I get them done.


Friday, November 22, 2019

Climbing Vines

I left a half hole in the ceiling for the mice to climb up to the second story but I had to make some vines for them to climb on.


I tore off pieces of kraft paper, applied glue to one side and folded and rolled them into a pencil shape the best I could. Then I just twisted them until they held their shape until they were dry.


I used straight pins to hold some of them to cardboard until they got dry and then glued to the wall going up to the second story.


They kindof look like twisted vines or roots. Mice can climb up to the upstairs bedroom and the turret.


Monday, November 18, 2019

Base Coat

Well, it's time to start pulling the look all together. I used dark colors for the base coats so the shadows would be really dark but the main reason for several coats of paint is to get everything coated with acrylic to make it more sturdy than ever before.


It really pulled it together. I will put on more coats of paint to give it some dimension and make the texture of the bark pop. This is going to dry for a while.


It's starting to come together now and look more like a stump house. I already have my furniture picked out for my mice. I'll work on that last.


Friday, November 15, 2019

The Turret

I wanted a little place for my mice to hide and peek out a window from so I decided to make a turret for them to play in. I cut the door first. I haven't decided whether to keep it as a hidden door or make it visible yet.


The inside is a little messy but I'm going to clean it up. I can't get in there to wallpaper it so layers of paint and maybe some glued paper will work Next, I cut a window on the front for the turret.


The window gets finished out like the rest. I made the floor of the turret out of foam core board and glued it in from the inside.


Once I started cutting windows on this thing I couldn't stop until I had it pretty well all windowed up. I think I've reached a point after this all dries where I can give the stump a base coat of paint next.


 UPDATE: The turret has a fresh coat of paint and a little round mattress. I had to patch a few cracks and holes in the enclosure first and wait for it to dry.


The outside of the turret is hidden. It has a little door knob so you can open the door.


Wednesday, November 13, 2019

Making Windows Openings

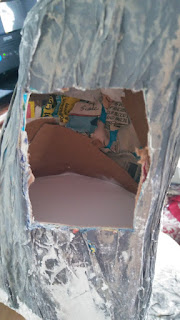
I decided to cut out some windows. I've been thinking about how I want to do this for a long time. I used an exacto knife and just started cutting.


My knife blade was sharp so it didn't damage the interior wallpaper much. It can be touched up. I smoothed out the paper clay into the sills and around the windows. They turned out O.K. I didn't want to put in too many windows but I wanted one downstairs by the door.

The thickness of the paper mache kind of made my decisions for me. I just couldn't cut into the thicker parts of the stump.


WHAT'S NEXT

I so want to put a turret room up in one branch to store the mice so they can peek out at you. I'll have to figure that out. Maybe an outside ladder or a balcony somewhere... lichen steps sticking out of the bark...

But first, mice need a way to climb up to the second story and they like to climb on vines.

Yes, this time Stump Cottage is going to get finished. The mice are tired of waiting for their home to be done!

Maybe they will be home for Christmas... we'll have to wait and see.


Saturday, November 9, 2019

Back Cover

There is always a dust factor to take into consideration with any dollhouse or sculpture. You don't know that maybe some day your house will be stored in an attic somewhere and you want to display it too. So you want to keep out the dust and dirt with covers and windows.


I always like to make a removable cover on the back of my dollhouses. Or I wrap them in plastic if I can't make a cover. Sometimes I will make a cardboard cover and just tape it on until I can do a more permanent solution. But I always like to protect my hard work from dust and dirt.

I cut this out after I made the stump and I'm glad I did it that way. But the edges are a challenge because they are layers of paper which didn't all get glued very well in places.


First I filled in the edges all around with wood glue. Then where they were the weakest, I used paper clay to fill in both on the edges and front and back. I did this over several days and let it dry between workings. I had previously cut a huge window in the back and decided to cover it up. I did cut two smaller windows later and reinforce the interior with paper clay.


Tuesday, November 5, 2019

Second Story Floor

Oh this was challenging. Because the stump was not a perfect circle, the floors were odd shaped. I had a tough time just getting the shape right but then, it looked crooked even when it was straight because I measured it.


I decided to put sticks the same length up from bottom to top to get a straight look for my floor.


The walls are not straight up and down so it was all hit and miss. I got it to where I can live with it. Then I glued the top floor to the top of the wooden sticks. I also added some woodwork to cover the edges of the bottom floor.


To finish the flooring I decided to seal it with matte Mod Podge. There is a cardboard layer between the layers of popsicle sticks on this floor so I had to brace it underneath until it dried so my floor wouldn't warp.


Sealing the floor helps keep it clean and fills in the cracks so dirt and debris can't get in it. It makes it look pretty too and gives it a luster but not a gloss. It dries clear and cleans up with water.


The first floor is lightly sanded and coated too.