Sunday, June 28, 2015

The Double Bed


Because I used the drawing of the child's bed on the book page to form the shape of the frame, I just assumed I would do the same thing with the double bed so I jumped in before I read all the instructions. Not a good idea. But once I had the frame cut and put together, I didn't want to waste my wire so I decided to just finish it (too small) and just make another the right size.

Well that will teach me to read first and not be in too much of a hurry!   :)


So, I wound up making two beds... one according to the instructions that fits well into the bedroom and one somewhat smaller but will look good in a room box someday in the near future.


It was good practice for me to work with that kind of wiring. The kind of wire I had could be hollowed out and stiff wire inserted so I was able to make it work in the end and I could bend it into shape and glue the pieces together with wood glue.


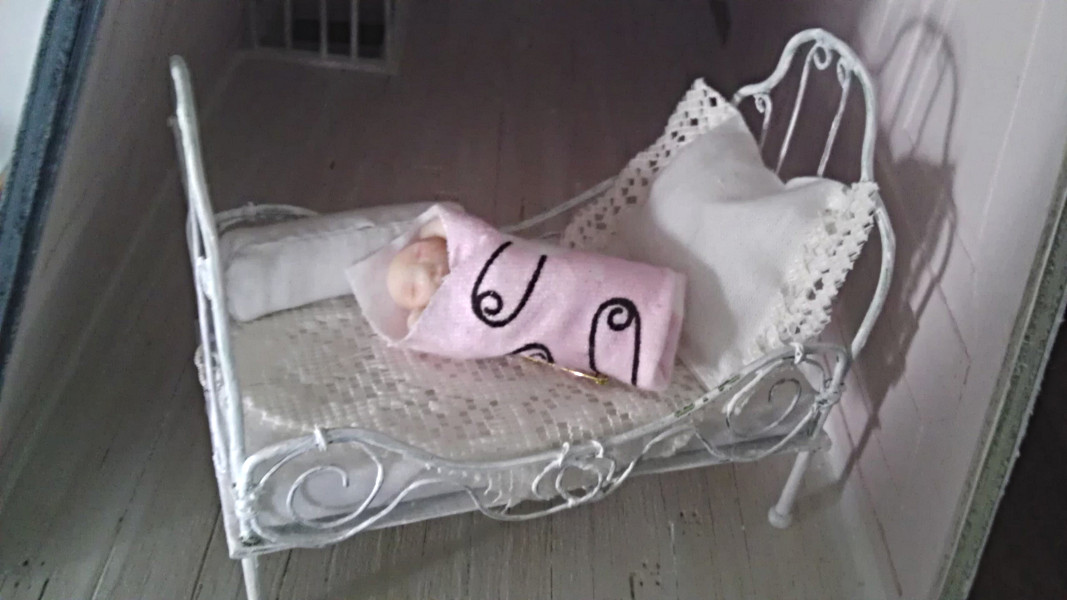
I gave the bed frame a coat of gesso and gold paint. I made the little box springs and mattress out of foamcore and glued cotton over them, cut a piece of lace for the cover and made a little stuffed double pillow to match.


It looks just like an old-fashioned metal frame bed.

Wednesday, June 24, 2015

The Wire Chair


This little chair is so cute and easy to make, I might have to make some more of them later. It's all done with a circle of card and florist's wire.


I used thread to reinforce the back to the seat but next time I think I'll use thin wire to do it.


I glued it all together with wood glue and made sure the legs were even so the chair would sit right without a wobble.


I gave it a coat of gesso and then tried to rust it up a little with some maple stain dry brushed on. The little chair looks perfect next to the tub. You need a place to set your rubber duckie, don't you?  :)


Friday, June 19, 2015

Entry Way Chair


This is the first chair I wanted to get made because the entry way looked so naked without furniture. The chair looks really complicated until you break it down in parts. I didn't think I had enough little spindles to make it but I did. I also used thin skewers for some of the rails.


Most of it is made from several layers of cardboard glued together. I did use little straight pins to reinforce what I could before gluing.


I used cotton cord with a gold thread running through it to make the "rattan" looking seat and glued the ends underneath.


I used little beads for the top of the back rails and then filled the holes with glossy accents. When the glue was all dry, I painted it white being careful not to get any paint on the seat. Then I dry brushed some maple stain on it and wiped it off.


TA-DA! A perfect little chair for the entry hall and not that hard to make.

Monday, June 15, 2015

Mirrors Everywhere


There are a lot of mirrors in this house. There's one in the entry, two in the kitchen, two in the bathroom, at least two in the living room, and I think two or three in the bedroom including one over each fireplace.


Well, I just made two out of the polymer mirror sheets with a sticky backing. My mirror sheet is from Tim Holtz. I also used cardboard for both and fabric braid for one of them. I leave the top protective mirror coating on until after I paint the frame. Then when I remove it, the mirrors are clean and shiny.


The larger mirror will go in the entry hall but I have to make a table before I hang it. The smaller mirror looks fabulous over the bathroom sink. More mirrors to go and the patterns for these two are in the book. They are really cute and easy to make!


Thursday, June 11, 2015

Child's Bed


Which I'm using for a crib... my baby isn't old enough to roll over. I am in love with all the furniture for this house and I'm so glad making most of it is included in the book.


Things with wire are "fiddly" and they can get nerve wracking unless you have quick drying glue. Things sometimes move before they set and wire does that a lot for me. I used florist's wire and another wire just a little thinner to make the curvy pieces.


Invest in a good quick drying glue and save your sanity when working with wire. It will test your patience sometimes but it's worth working with it for the finished product.


I made the mattress with two layers of foamcore glued together and then covered it with plain cotton. I made a couple of little pillows to make the bed cozy. It wouldn't take much to just make the sides a little higher for a crib but I didn't think about that while I was working on it because I thought it was adorable just the way it was. Cute, cute, cute.


Monday, June 8, 2015

The House Part Is Done!


In my mind, there was always going to be two parts to this project. The first part was getting the house together and getting the rooms decorated. Then the second part was to make all the furniture. I wasn't sure which one was going to be the most time consuming, or the most fun. So far, I've had a blast. I've never made a house this detailed, precise OR as polished as this one. I feel like I can take a deep breath now.


Going about it like I did is pretty much the plan if you follow the book. So, I've gotten the first part finished and I'm trying to decide what furniture I want to make first.


The outside of the house is finished. I could add some wear and tear on the ground level to look more realistic, and I could add some vines and plants, flower boxes, etc... I could streak the roof to give it some character - and I might do all that stuff later. There are so many possibilities here.


The inside of the house is "show ready". It's in the same state a real house would be in if you were to show it for sale. Fresh paint, clean floors and new doors.


I have never made much dollhouse furniture from scratch but I love the style of this little french country house so I'm looking forward to learning how to do all that too. Boy - that baby's room looks really bright in this picture. I might tone that down with a white wash... just noticed that.

The furniture in the book is just darling so I can hardly wait.


I'm finding what I love the most about this house is those little chandeliers! I don't know why? I'm surprised by how good the floors turned out too since I didn't exactly follow the book on those. I found an easier way to do them.

I'd like to shrink myself down and just move right in! Can't wait to get started on the child's bed since I already have a baby for the house. Then I think I'll go downstairs to the entry and do something there.


Thursday, June 4, 2015

The Boudoir Is Done!


Oh my! I'm so in love with this room! And the house is finished (mostly) with the decorating part. I have a few little details to fix here and there. Then comes the fun of making the furniture from scratch. I'm glad Lea Frisoni's book gives the details for most of that too. I feel like I've learned so much already!


The bedroom was a little challenging with all the built-ins but it went really quick because I had already done everything in the other rooms so this one seemed easy. The instructions in the book were the best that I've ever made anything from. All the measurements are pretty spot on. I honestly knew how I was going to do most things in the house before I got to them.


The book calls for the fireplace to light up but I was really over and done with all the electrical wiring stuff at this point so mine doesn't light up but I can add button cell lighting later if I choose to. You can always add wiring to a house somehow.


I also did not put ceiling beams in this room. Instead I glued decorative textured paper onto the ceiling and I wanted to showcase that instead. I would like to add some medallions to the chandeliers maybe later.


I finally got the last door up! TA-DA! The boudoir is done!


Monday, June 1, 2015

Roof Update


Now that the whole house wiring is finished, I can put the top roof on. I glued it on by spreading a generous amount of wood glue on the edges and on the support strips underneath the top and then taped it to the roof with masking tape and let it dry overnight.


I cut the vertical strips to a half inch back from the top edge. Then I cut out one inch strips to cover the edges of the top roof, filled in the edges with paper clay to dry over night. Then I painted and let them dry.