Saturday, May 30, 2015

The Bedroom Walls


All the walls are pretty in this room but the outside wall holds the most interest. Love the little built in shelves and mini-closet. It starts out pretty plain and you have to check the clearance space for the back of the shelves with the slope of the roof to make them fit just right.


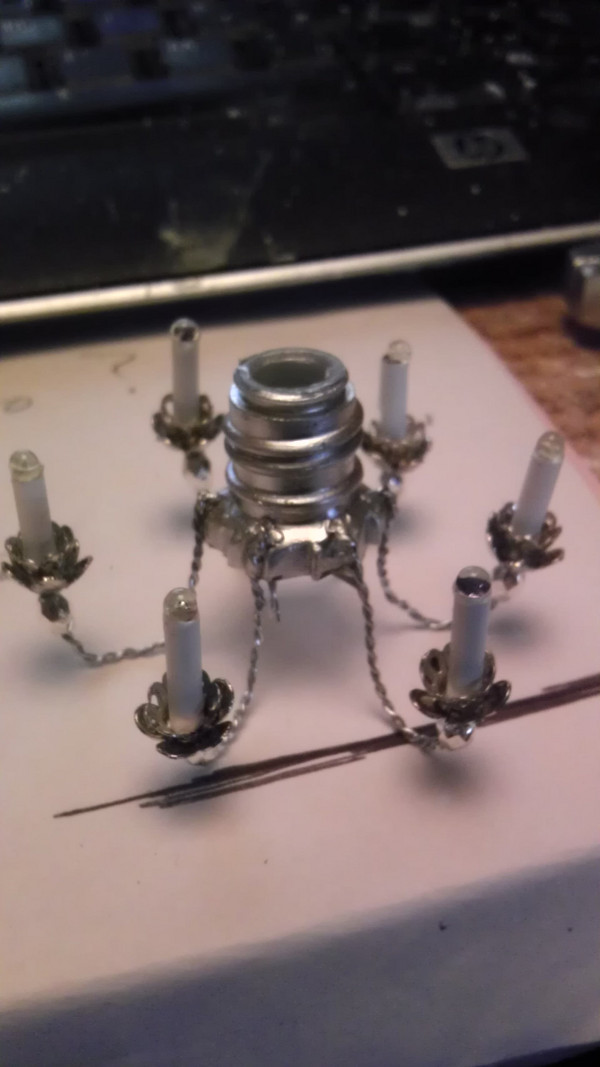
This room has a fireplace too. I made a decorative swag for the carved wood piece out of polymer clay and then made a mold so I could duplicate it for more. I couldn't find a curved decorative strip or a pre-made mold for the tops of the built-ins and the long wall so I had to make my own.


For the fireplace in this room I made some decorations for the front and kept it light with white paint and a faux white marble finish on the mantle and front panels.


These are my molds. I ran out of mold putty and thin wood for trims while finishing this room. I can't believe I used six whole sheets of thin balsa for the trims and built-ins for this house! I have used up a lot of my supplies on this project! If you saw my stash, you'd know that's a good thing. But I'm nowhere near done yet.


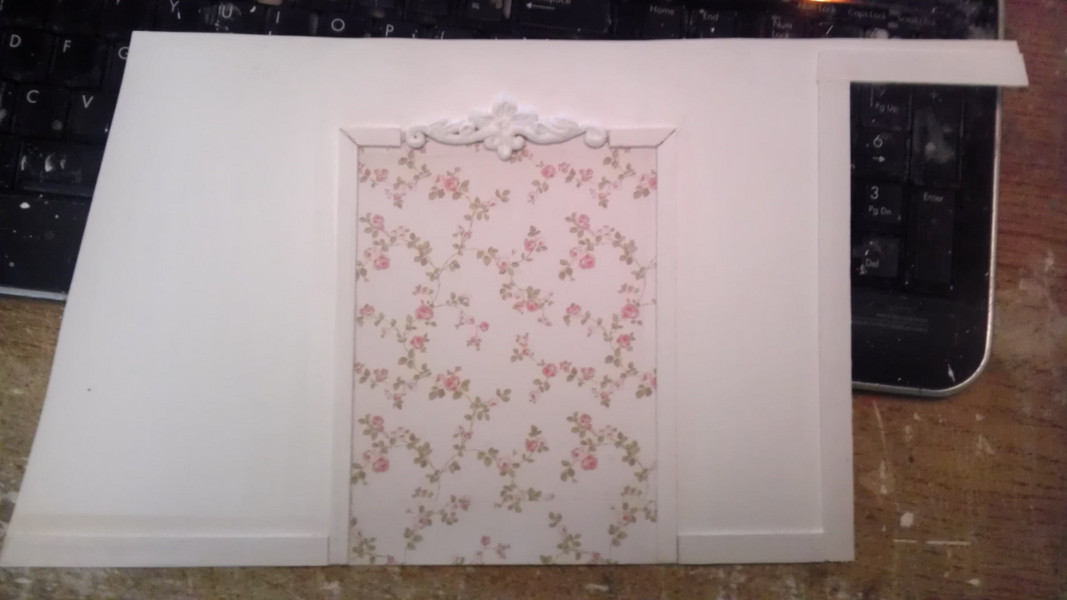
I love the wallpaper for this room. I got it at Far Far Hill. It's one of the free papers in the pack called 'Premonition of Bonheur'.


Just a few little finishing touches and I still need to make the door separating the two rooms. I think I love this room the most but I say that with each room I do until I get to the next one. So being the last room to finish... I think I like this one the best! I'm ready to move in!


Thursday, May 28, 2015

The Boudoir Floors


This last room went so quick! The floors on the main bedroom were super easy since I used another embossing folder and pressed out my pattern in sheets before cutting them in strips and gluing them to card before putting the whole floor piece in.


The color is gorgeous! I'm thrilled with how the maple stain turned out. I just painted it over a coat of gesso. It's FolkArt Maple water based acrylic stain.

Monday, May 25, 2015

Living Room Done!


I thought the living room was going to be easy and it was... until I got to the outer wall. There was so much detail on that wall it was crazy. I spent most of my time just on that one wall.


The fireplace was something I was looking forward to and I wasn't disappointed while working on it. I loved the way the marble mantle turned out and all the little details. I loved the little painting that I glued to the wall and then framed with dimensional paint.


My stuff is a little different from the book but that's o.k. I didn't do the walls two-toned, I just let the wood color show through on parts of it. I didn't light up my candles on each side of the fireplace either. And I love the way the embossed floors turned out too.


But that chandelier is just the most darling thing in the room... and those little candles. I can hardly wait to get started on the furniture. But before I get started on that, I have one more room to decorate. Next - it's upstairs to the boudoir. It's got a fireplace too. And some built-ins. Can't wait to get started on the floor!


Sunday, May 24, 2015

Living Room Doors


The first step in making doors is to measure the opening. I always draw a paper square the size of the door opening and make my door on top of the drawing so I can keep it square.


Then I cut my pieces and strips out of 1/16" balsa or basswood and glue them together making sure they fit the pattern.


When I get the first side and separators glued together, then I paint them. I cut and add the thin plexiglas to the door after the paint is dry. I paint the rest of the door pieces before I glue them to the door. But first I add my hinges made out of metal tape and straight pins. I put the hinges on the layer closest to the side that the door opens into. These doors open into the living room. I clamp the layers together to dry using wooden clothes pins.


To fit the doors into the opening, I tape them together with masking tape and see if I need to trim a little off for a smooth fit. Before I put the doors up, I put a little strip of thin wood underneath them to give them clearance while the glue on the hinges dries.


Then I put the door frame (woodwork) around the doors to cover the hinges and finish the doors off. Sometimes I add a coat of paint or two where the doors come together to make them stick so they'll stay closed when I shut them. OOPS, I still need to add the door knobs!

Thursday, May 21, 2015

Living Room Walls


The far wall is done exactly like the kitchen, even the window trims. The wall is brought out by making a frame around the windows and then gluing on a facing, not unlike building out a real wall with 2 x 4s and wallboard.


The other walls get a dimensional panelling effect similar to the nursery walls, only a different color.


The inside window trims are cut out of card, painted and glued onto the inner top and sides of the windows. The walls around the french doors were cut from cereal boxes and glued in like the other rooms.


This room has a fireplace on the outer wall. I made my fireplace from balsa and decorated it with dimensional paint on the front and I'm doing a faux marble finish on the mantle.


Monday, May 18, 2015

The Living Room Floor


The living room floor in the book is a beautiful wood pattern that takes over 500 pieces of wood to stain and cut out - but I think I can speed up the process a little and make something just as pretty using my embossing folders and some cereal box cardboard. So I pressed out about twelve pieces of the same basic pattern using my cuttlebug and a Paper Studio embossing folder.


My pieces were not wide enough to cut the pattern on the diagonal so I had to cut the pattern pieces square and then set them diagonally. I painted them with a burnt sienna acrylic paint and then did a dry brush technique and a wash using beige on some of the rectangles with a burnt sienna wash over that to blend it in. I varied the colors and amount of paint to make it look like wood grain. I used the same basic pattern to lay out the floor with my pieces. They kinda look like waffles at this stage!


I glued the embossed pieces to poster board, adding burnt sienna strips around each piece like the pattern in the book until I had a beautiful flooring piece. I let the floor dry overnight with a couple of books on top for weight and the next day I glued it into the room and coated it with a matte Mod Podge finish. Beautiful!


Saturday, May 16, 2015

The Chandeliers


It's just as easy to make two chandeliers as it is one while my wire and beads are out. I'm making one for the living room and one for the bedroom. The one for the living room is going to look silver and the one for the bedroom is going to look gold plated. They will both have six candle "lights" but only the center will light up with a regular bulb.


I got the fittings in the jewelry dept and I made the main holder piece out of the top of a little bottle. Then I poked holes in it for the wire. I used the guts of a cheap stick pen for the candles. You can blow out the ink and clean them out under a faucet before cutting.


I twisted the wires for the arms of the candle holders and used glossy accents as a glue to hold it all together because it dries hard and crystal clear. I also made the little clear light bulbs on top of the candles with it.


The finished living room chandelier has some beads glued around the bulb holder. I wish I could let them dangle but I don't want to take a chance having the wires pull out of the bulb again like the kitchen light did.


The bedroom chandelier is a little fancier with larger candle holder bases. The top holds the light bulb secure to the ceiling. I will make some round ceiling medallions to help secure the fixtures for each room.


Friday, May 15, 2015

The Kitchen is Done!


I got all the trims painted and some little details in even though my pictures don't show the side window. It was still drying from having the trims put on it.


I covered a piece of plexi with aluminum tape and drew a design on it with the point of a knitting needle for the stove heat deflector. Then I smeared white paint on my finger and dabbed it all over the design, wiping it back off so it will stay in the creases.

I also made a little towel rack/plate holder over the range cubby. I used two tiny eye screws and a sliver of wood for the dowel.


I made the plumbing out of a piece of florist's wire and bent it to shape for the sink pipe and faucet. Of course there are more details I want to finish but it will have to wait for later because I don't want to get bogged down in too much detail at this stage. I'm keeping my momentum and moving forward up to the living room next.


Wednesday, May 13, 2015

The Kitchen Sink

I just love the old world look of the kitchen sink. I'm so glad the book gives instructions for making the fixtures and furniture too.


I just cut my balsa pieces out and glued them together. I trimmed a little off to fit in the cubby space of the wall. Then I rounded in the joints with vinyl spackling. When that was dry, I painted it with white paint and added a little rivet drain hole.


I cut thin strips out of my thin wood and made a little draining/drying rack for the sink. I'm thinking of making a little curtain to put on the front of the sink just for cuteness.


The kitchen is almost done now. I just have a few little trims to finish out then we'll be moving on up to the living room. This is going faster than I thought but I still have to do ALL the furniture so we'll see how fast that goes. And I've even managed to get some (real) gardening and yard work done in-between working on the rooms.


Tuesday, May 12, 2015

The Kitchen Walls & Ceiling


The front window walls were built up with thicknesses of foam core to box in the sides of the windows. Then they are decorated with side and top panels cut out of heavy card. My favorite substitute for bristol board is cereal boxes.

Wood trim and wallpaper finish off the wall beautifully.


The inside wall of the kitchen gets a wood strip treatment by the doorway and a panel and wallpaper treatment toward the front of the house.


The outside wall with the back door is a very interesting wall. It houses the sink and appliances in little divided cubbies and it hides all the wiring from the other levels behind the walls. The ceiling has beams going across it in two directions which also gives it more interest than a plain ceiling. I still have to fill in the edges and touch up some paint on those.


I'll probably go ahead and make the sink but save the stove and fridge for another day. What! No microwave? I guess they really did have it rough back then.   :)


Sunday, May 10, 2015

The Kitchen Light


The kitchen light is suppose to look like a pull down light. I didn't have any little pulleys or the know-how to make them so I faked it with cardboard "pulley-shaped" pieces painted gold.


The shade is cardboard covered with lacey fabric and the edge has some lace glued to it. I use a small filigree jewelry piece on the top of the shade. I made the little weight with three beads I glued together and then glued a fake pulley on top of that. Now I can wire the kitchen side of the house and get started on those walls.


UPDATE: I had to rewire the light in the kitchen. I found out the wires had pulled away from the bulb. I'm glad I didn't have the walls up yet. I had to go buy another wire w/bulb attached. I tried to solder the wires back on the socket but it didn't work out. Now I have to worry about that happening in another room after I get the walls done! I need to make sure the socket wires and sockets are really well attached to the fixtures in all the rooms so they don't pull loose again.

Saturday, May 9, 2015

The Kitchen Floor


I love the way this floor turned out. I could not see me cutting out over 800 little hexagon tiles from card for this one! Pul-eeze... my nerves are still recovering from the double stairway rungs... soooo, I thought of a different and quicker way to simulate my hex tile floor for the kitchen.


I had an embossing folder with the perfect hexagon pattern on it so I thought I would use my Cuttlebug to press out several cardboard sheets of flooring and cut and fit the sections together, glue them to poster board and just use paint to give it a faux finish. Did I say, "I LOVE IT!" Just look at that texture and color!


It looked brand new, shiny and too good for an old floor until I dragged and swirled a cocoa colored ink pad across it in places before I sealed it with matte Mod Podge. I haven't waxed it yet but it's already gorgeous. You can even see the raised cut tiles where the sections were joined that helps to give it a real tiled look.


I decided to do the floor before I did the walls because I did not want to cut out around the different wall sections. Once the floor was down, I installed the back door. For the floor color, I used a FolkArt 'true burgundy' base coat on all of it and then dry brushed and smooshed the color terra cotta into the tiles, trying not to get it in the faux grout lines. 

Friday, May 8, 2015

The Baby's Room is Done!


It's hard to believe it's been over 2 months since I started this project and I have half of the house (mostly) done working on it a little bit each day (some days more than others).

Beams go across the ceiling in some rooms but I was saving them for last except for the baby's room. I decided to put them in since the room went so fast and I wanted to see how it looked.


This room turned out so darling. The furniture will make this room pop. It's very light pink and so pretty.

My little baby doll will be happy to sleep in here!

Wednesday, May 6, 2015

The Baby's Room Walls


The walls of the baby's room come together with thin strips of balsa and strips of cereal box cardboard cut at angles to make textured panels. The book calls for different wood than I have so I improvised with thick cardboard.


I glued the balsa framework onto poster board and then cut my angles and fitted them together in paneled sections.


When the glue was dry, I gave each wall a base coat of gesso and painted with a pale pink when dry.


I glued each section up and let it dry before filling in the corners with vinyl spackling.


This room was easy peasy after doing all the tile work and stairs.


The tile work was tedious and the stairs were nerve racking. I guess getting the hard part over first was the way to go. Now I can really enjoy working on the other rooms.


It does seem this room came together so quick. I didn't have any trouble with the walls fitting together nicely either. The instructions in the book are spot on.